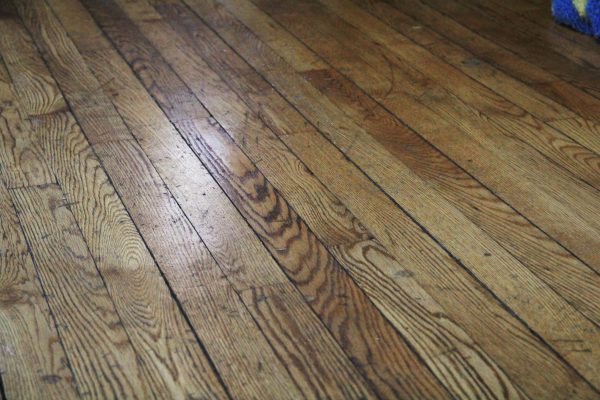
Steps To Refurbished Hardwood Floors
Hardwood floors are something to be desired in a home. Older homes have these in most of their rooms. Interestingly enough not everyone appreciates hardwood floors. The carpet material was brought into homes because hardwood floors were harder to keep warm in the winter. But these days people appreciate a good hardwood floor, especially original.
However, if the home you own or rent has hardwood floors they have seen some rough use over the years. After all those years of people living in a home, it could be time to refurbish those floors. Refurbishing your hardwood floors will be an easy job with these steps.
Clean the floors
The first step to hardwood floor refurbishment is cleaning the floors. It’s important to make sure that all dust, hair, grime and dirt are off the floor beginning any process.
Also, before making any changes make sure you ensure that your floors can be refurbished. Floors made of the laminate material will be ruined by refurbishing and floors that are engineered hardwood do not make good candidates for refurbishment.
Sand and scuff
Sanding is the next step. Pay attention to the grit of your sand paper in the instructions below. The use of each different grit is imperative at different stages.
Essentially only real hardwood floors should be refurbished. So, be extra careful before you start. Luckily there are tips and tricks to know before you start the project.
Get a demo. When you start the project you will need to rent the proper equipment. A good equipment company will be able to show you how to use the equipment right. Avoiding any mistakes during the project.
It will be a good idea to do a test run first. Pick a small spot on the floor and see if there are any bubbles or problems with the seal. If anything looks unusual, strip your floors with an ammonia and water. Then buy chemical-hardwood cleaner.
This next step is optional. Skip the stain. You can seal your hardwood floors with water-based polyurethane. A stain is an option, it will take away from the natural look of the floors, but some people appreciate the colour. So this is personal preference.
Cut in along the edges — It’s important when you start the project to cut in along the edges. It’s a lot like painting that way. Always make sure the edges are corners a properly sealed by the polyurethane. This step will ensure you have smooth lines to start.
How To
How to apply poly — properly
- Prep the area with a good sanding
- Sanding the area will depend on what type of stain you might want to use. This will require a close examination of your floor and stain. Most floors, though, require a medium grit sandpaper, then a fine, and lastly, a super fine. As important as sanding may be to this process, so is cleaning the area. After the surface has been sanded, the renovator will have to sweep or vacuum up the leftover dust, followed by a wipe down with a cloth.
- Seal the surface: This is important. When you purchase a product like a stain, you might find that some of them are self-sealing. This step is not required. You will need to thin the polyurethane for this process. Thin your poly with mineral spirits. That would be one-part mineral spirits and two parts polyurethane.
- Apply two coats of undiluted polyurethane (24 hours apart): This step is fairly simple. Take a long handle 1-inch brush and start applying the poly. Work in 10-minute increments to ensure proper application. Once you’ve done that. Go around the edges again to seal it off. Do these steps 24-hours apart.
- Fix the nasties: Using a small blade, examine the floor closely for any small bumps or bubbles in the floor. Once you’ve carefully removed the bumps and bubbles, use extra fine sandpaper to smooth down the edges.
- Apply a final coat (up to 48 hours after the original): Lastly, the next step is simple. Apply the final coat 48 hours after the original. This will allow for the perfect adhere for the poly. Wait up to a week before moving any furniture back into the room.
Always take your time. Taking your time is one of the key aspects to refurbishing your floors. This process can take up to a week or more before it’s truly complete. This will give it time to dry and seal properly.
And, the best tip, wear socks. Pets, shoes and bare feet can ruin all your hard work, so be sure to wear socks. This will even help buff the floor some more. A bonus huh!
So, before starting the refurbishment of your floor takes into consideration all these tips.